Azure virtual machines can be created through the Azure portal. This method provides a browser-based user interface for creating and configuring virtual machines and all related resources. This Quickstart steps through creating a virtual machine and installing a webserver on the VM.
If you don’t have an Azure subscription, create a free account before you begin.
Log in to Azure
Log in to the Azure portal at http://portal.azure.com.
Create virtual machine
- Click the New button found on the upper left-hand corner of the Azure portal.
- Select Compute, and then select Windows Server 2016 Datacenter.
- Enter the virtual machine information. The user name and password entered here is used to log in to the virtual machine. When complete, click OK.

- Select a size for the VM. To see more sizes, select View all or change the Supported disk type filter.

- On the settings blade, keep the defaults and click OK.
- On the summary page, click Ok to start the virtual machine deployment.
- The VM will be pinned to the Azure portal dashboard. Once the deployment has completed, the VM summary blade automatically opens.
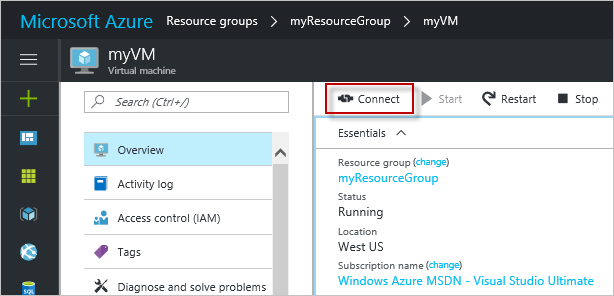
Connect to virtual machine
Create a remote desktop connection to the virtual machine.
- Click the Connect button on the virtual machine properties. A Remote Desktop Protocol file (.rdp file) is created and downloaded.
- To connect to your VM, open the downloaded RDP file. If prompted, click Connect. On a Mac, you need an RDP client such as this Remote Desktop Client from the Mac App Store.
- Enter the user name and password you specified when creating the virtual machine, then click Ok.
- You may receive a certificate warning during the sign-in process. Click Yes or Continue to proceed with the connection.
Install IIS using PowerShell
On the virtual machine, start a PowerShell session and run the following command to install IIS.
Install-WindowsFeature -name Web-Server -IncludeManagementTools
When done, exit the RDP session and return the VM properties in the Azure portal.
Open port 80 for web traffic
A Network security group (NSG) secures inbound and outbound traffic. When a VM is created from the Azure portal, an inbound rule is created on port 3389 for RDP connections. Because this VM hosts a webserver, an NSG rule needs to be created for port 80.
- On the virtual machine, click the name of the Resource group.
- Select the network security group. The NSG can be identified using the Type column.
- On the left-hand menu, under settings, click Inbound security rules.
- Click on Add.
- In Name, type http. Make sure Port range is set to 80 and Action is set to Allow.
- Click OK.
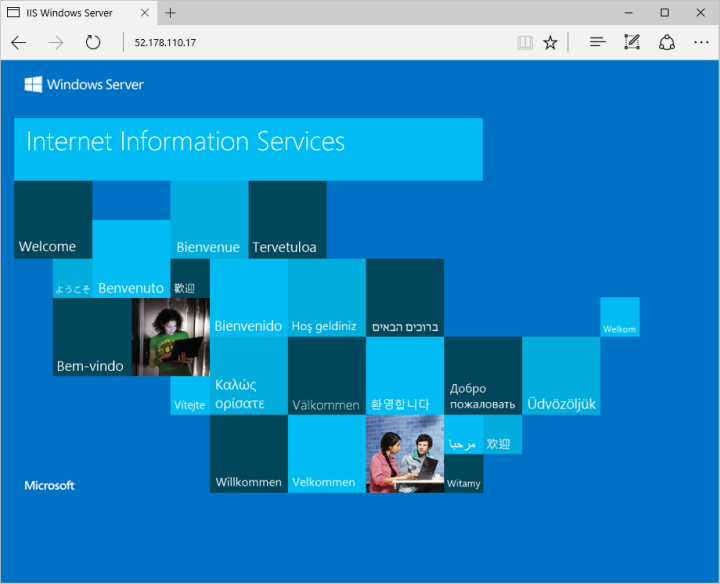
View the IIS welcome page
With IIS installed, and port 80 open to your VM, the webserver can now be accessed from the internet. Open a web browser, and enter the public IP address of the VM. the public IP address can be found on the VM blade in the Azure portal.